For $500, My Rental Bedroom Went From Plain White to Cottage-Worthy
Now it’s a sage green dream.
Published Nov 14, 2023 1:45 AM

We may earn revenue from the products available on this page and participate in affiliate programs.
In Renovator’s Notebook, homeowners open up about the nitty-gritty of their remodels: How long it really took; how much it actually cost; what went horribly wrong; and what went wonderfully, serendipitously, it’s-all-worth-it-in-the-end right. For more tips to nail your next project, follow @reno_notebook.
Location: Portland, Oregon
Budget: $500
Year built: 1940s
Top priority: Bring some color and sweet ’40s charm to a plain white rental bedroom.
Chelsea Harris’s reasons for moving into her one-bedroom Portland apartment last January were simple: spend less money on rent and more time surrounded by historic charm. Harris, a copywriter for Schoolhouse, found what she was looking for in a circa-1940s building that had a sweet galley kitchen with checkerboard floors, to boot. Right away, she focused all her energy on making updates to said kitchen: She painted the lower cabinets yellow, added a peg rail for hanging produce bags, and applied butcher block–inspired contact paper to the counters. Then she moved onto the bathroom, where she DIYed a beadboard wall and swathed nearly every inch of the space in pink. So what next?
“The bedroom felt like the last place where I could really add color,” says Harris. “I thought, Okay, what can I do in a rental bedroom? I’ve never really made one over before.” Having already spent a good bit of money updating the other areas in her apartment, Harris set out to spend less than $500 on this space. And if you are wondering, she’s more of the ask-for-forgiveness-not-permission type of renter. “If I lose my security deposit, it’s worth it to me to have a space that feels good,” she says.
The Receipts
Here’s a taste of what Harris spent on her bedroom.

- Wallpaper: $200
- Paint (2 gallons, plus brush and tray): $100
- Wall trim: $60
- Shelf brackets: $16
- Curtains: $100
- Curtain rods: $72
- Shelves: free!
Paint Everything (Even If You’re Still Contemplating Wallpaper)
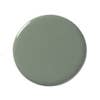
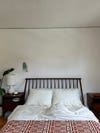
I think choosing the color was probably the hardest part. I spent a lot of time at Home Depot looking at paint swatches, but I eventually went with Nature’s Gift by Behr. I didn’t prime my walls; I just went for it. I used a roller at first and applied two coats, three in some areas (it was a very gloomy week in Portland when I painted, and later on, in the natural sunlight, I noticed some spots that weren’t fully painted that I had to go back over).
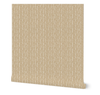
Pick a Small-Scale Wallpaper Print If You’re Using Pattern Elsewhere

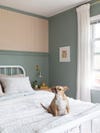
I probably lived with my bedroom just painted for two or three months, but I felt like wallpaper would totally change the space. I had a browser open on my computer and I’d look at wallpaper daily. I really wanted something subtle because I have a plaid rug. I chose the Ric Rac wallpaper from Spoonflower because, when you look at it from far away, the squiggles are so small that it almost doesn’t look like a pattern, it looks like a solid color.
It was easy to calculate how much I needed on the website: I measured the height and width I wanted, and it totally worked out. It comes rolled up in little sheets that you peel off like a big sticker, and it’s clear where you line it up with the next panel so it looks seamless. It probably took me two and a half hours because my walls are slightly slanted. I ended up having to paint the trim around the top of the ceiling more so in certain spots to make it appear as if the wallpaper was straight across the top.
Mark a Natural Cutoff Point With Trim

I felt like the wallpaper was looking a little short, so I bought a piece of trim from Home Depot to add along the bottom. I went with the widest one I could find, and I like that it’s more traditional and the paper is so funky. It took me probably two hours to paint the trim because there are so many crevices. I used a nail gun to mount it to the wall.
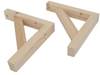
Phone a Friend and Say, “Can I Take Anything Off Your Hands?”
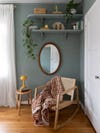
A friend of mine was moving out of her place and had some extra shelves lying around that she and her partner had custom-cut, so I decided to take those and add some shelving over the reading corner. The bedroom isn’t huge, so I wanted more storage, but I also didn’t want another huge piece of furniture in the room. Painting the shelves and brackets I picked out on Amazon (I’ve used them all over my apartment!) the same color as the wall created a built-in effect.
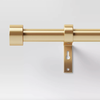
Go Gauzy With Your Curtains
I already had the curtain rods from Target, which ended up working out because I really wanted to go with warm brass accents in this space. The curtains are pretty gauzy—you can see through them, and I prefer that because there isn’t a ton of light in the room. I wanted something that offered privacy but also allowed in light.
Take Your Brush to the Furniture, Too
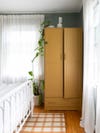
I found the wardrobe at a local thrift store. Someone had done a bad sponge-paint job on it, so I repainted it. My partner and I both work from home, and he uses the main closet in our bedroom as his workspace, so this (along with a living room closet) is where we store the majority of our clothes. I definitely led the charge on the DIY—he moved in with me after I had done most of the work, so it worked out for him!